3 Weekend Projects
Season 17 Episode 1711 | 26m 46sVideo has Closed Captions
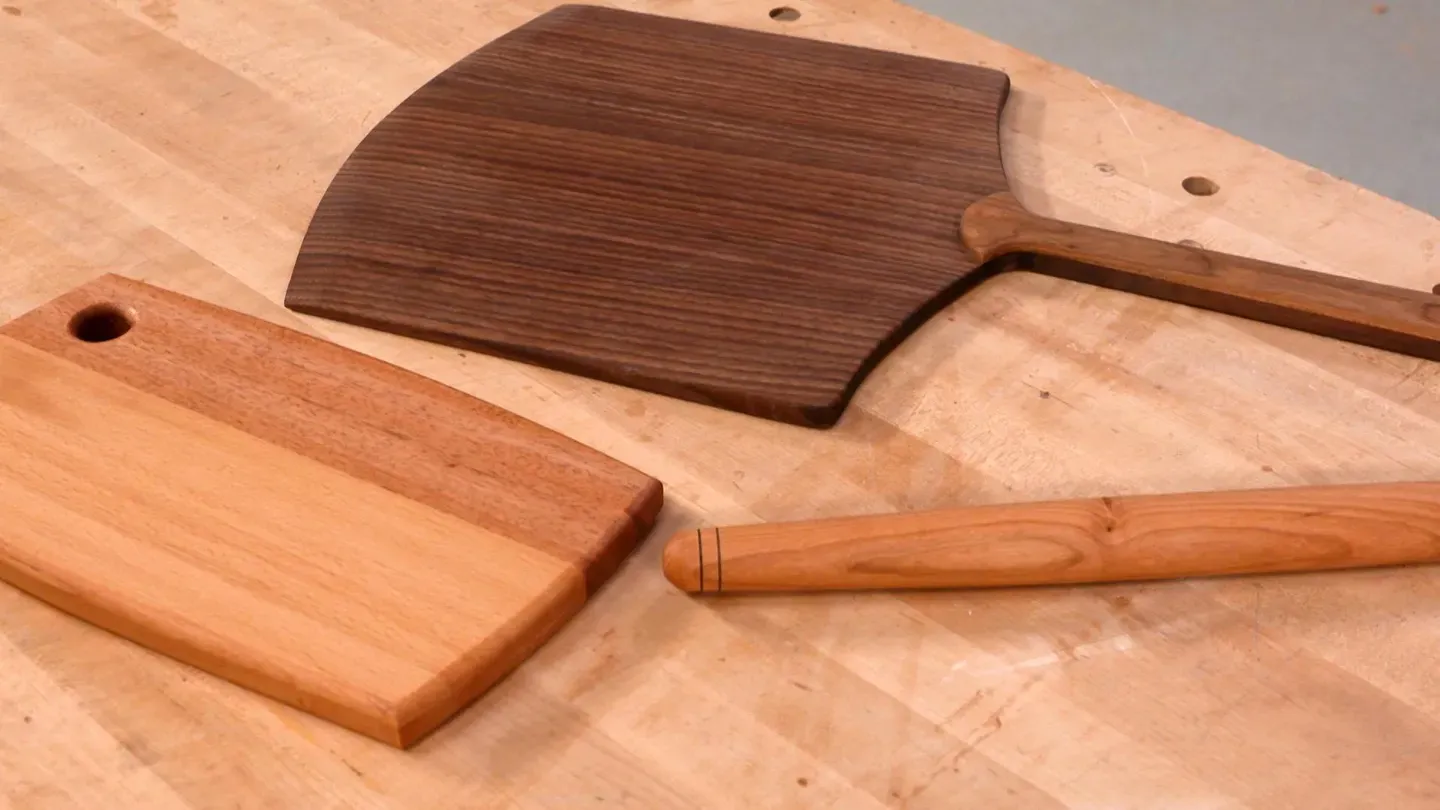
Learn how to make a pizza peel, turn a rolling pin, and design a cutting board.
Create three kitchen projects for yourself or as a special gift. Learn how to make a pizza peel, turn a rolling pin, and design a cutting board. All three of these pieces are made from a small amount of material and offer plenty of woodworking lessons.
Problems with Closed Captions? Closed Captioning Feedback
Problems with Closed Captions? Closed Captioning Feedback
Woodsmith Shop is a local public television program presented by Iowa PBS
3 Weekend Projects
Season 17 Episode 1711 | 26m 46sVideo has Closed Captions
Create three kitchen projects for yourself or as a special gift. Learn how to make a pizza peel, turn a rolling pin, and design a cutting board. All three of these pieces are made from a small amount of material and offer plenty of woodworking lessons.
Problems with Closed Captions? Closed Captioning Feedback
How to Watch Woodsmith Shop
Woodsmith Shop is available to stream on pbs.org and the free PBS App, available on iPhone, Apple TV, Android TV, Android smartphones, Amazon Fire TV, Amazon Fire Tablet, Roku, Samsung Smart TV, and Vizio.
Providing Support for PBS.org
Learn Moreabout PBS online sponsorship[ Power saw whirring ] [ Mid-tempo music please ] >> Welcome back to "The Woodsmith Shop".
Today, we got a really special weekend workshop episode planned for you.
The whole idea here is to look at three different projects that you can easily build at least one of these in a weekend and probably more.
We're going to get things started with Chris Fitch making a pizza peel that's going to make pizza and movie night or your latest sourdough loaf, or even a pan of cookies, come out of the oven a little easier.
Logan goes back to the lathe to turn a French style rolling pin.
If you've been looking for a way to get into some turning and lathe work, this is a great project to get you started.
I'll wrap things up with making a scrap wood cutting board that's just as easy to make one as it is seven.
If you're ready to build along with us, the plans are at our website, WoodsmithShop.com.
It's time to build.
Announcer: Major funding for "The Woodsmith Shop" has been provided by... Old Masters -- offering wood stains and finishes for the woodworking enthusiast and professional.
And by... Kreg -- from the first cut to the final assembly, providing woodworkers with products that help to simplify woodworking challenges.
Kreg.
Additional funding provided by... Titebond Wood Glues -- the pro's advantage.
And by... ♪♪ ♪♪ ♪♪ ♪♪ ♪♪ One of the reasons I like turning is these are quick projects.
Here, we can create something really useful, like a rolling pin.
That's what I'm going to show you how to make today.
One thing I like about rolling pins is they don't require a whole lot of stock, they're easy to turn, and they make great gifts, and you can kind of practice your techniques, as well.
So what I've done here is I have two blanks.
Most of my blanks are going to start like this.
They're going to be square.
However, if you want to speed up your time at the lathe, you can go ahead and knock the corners off.
And I did that on this one.
I simply took it to the band saw, tilted the bed to 45 degrees, and I nipped off those corners.
Now, it's really not going to save you a whole lot of time unless you are batching out a ton of these at once.
And this is a great project to do that.
So if you're going to make 5, 10, 15 of these, go ahead and take the time to knock the corners off and it'll save you a little bit of time at the lathe.
So how am I going to hold this?
Well, this is the perfect thing to use a drive spur on.
A drive spur, as opposed to a chuck, which grabs this, gets driven into the end, and these little sharp points on it really grab the wood.
And that's what transfers the power from the lathe into the wood.
So, I've already marked centers on both of my ends here.
I just did that by crossing the corners of this octagon shape.
And now, I'm going to put that drive center in, and I'm going to use a soft headed mallet to drive that in.
We want to make sure it gets a good bite.
Looks good.
So now, that drive center goes in the headstock, and we can bring the tailstock up to the other center point.
Here we go.
Looks like it's running pretty true.
So now, we have to rough this down.
The shape I'm going to go for is going to be a French style rolling pin.
It's going to be about a 9 or 10 inch working area in the center, and then it's going to simply taper down on the ends.
We're going to aim for about 20 inches overall length, but the length doesn't really matter.
So we have a couple of ways we can rough this down.
I'm going to show you those.
The first way is going to be with a spindle roughing gouge.
And that's this guy here.
It has a deep flute, and it's grounded at about a 45 degree angle.
But the profile from the end is pretty much straight across.
And this is the tool we usually use to rough down spindles.
And when I'm talking about a spindle, I mean anything that has the grain orientation running the length of the bed.
That would be opposed to faceplate work, which is like doing a bowl where the grain is actually perpendicular to the bed.
So to make my cuts on this, I'm going to position my tool rest so that when I'm holding the gouge, it's going to cut right at the center line.
And then we have two different ways we can approach the wood with this tool.
We're always going to approach it rubbing the bevel first, and then we'll raise the handle, which is going to lower the cutting edge until it starts taking a cut, and then we can move the tool back and forth.
But what I mean by two different ways we can approach it is we can use the bottom of the flute, which is going to be the rounded portion, or we can roll the tool on its side and use the straight portion.
When I'm working on something straight like this rolling pin, which is going to be a little tapered, but it's mainly a straight cut, I'm going to use that wing because it is a flatter cutting surface.
It's much easier to make a flat surface using a flat cutting surface.
So I'm going to go ahead and make that cut and kind of float back and forth on the tool rest and rough this down until it is round.
So you can see that spindle roughing gouge really takes away those corners super quickly.
Now, as you're turning, you can actually check if it's round yet by resting your tool on top of the workpiece.
If it bounces, you still have a flat spot.
But if you rest your tool on the top and it runs smooth, you know you've got it down to a cylinder.
I'll show you that real quick.
So over here, the tool is bouncing.
That's because those corners are hitting, so we know it's not round.
But if we go over here, tool runs smoothly, and we know that it's a perfect cylinder because it doesn't bounce.
So now, the spindle roughing gouge works really well, but like in most woodworking, there's other tools we could use.
Another tool that we could use to do this same type of thing is this guy.
This is a skew chisel.
The skew chisel really is a spindle turner's best friend, in my opinion.
You can rough with it, you can make planing cuts, which are nice and smooth, and you can cut in details, like beads and even a couple of coves.
Let me show you how we are going to rough with this.
So with this skew chisel, I've ground this so that there is about 1/3 of the tool that is a flat section, and then it kind of dips off into this short point here.
And we'll use that short point in a bit.
But for this first roughing cut, it's going to be a peeling cut.
So I'm going to let that bevel rub on the wood once again, and I'm going to raise the handle with the skew chisel basically perpendicular to the workpiece.
And we're just going to peel it off in steps, and we'll work across like that.
Now, the peeling cut works really well, but it doesn't exactly leave us a really smooth surface.
So instead, what we can do is we can use... the skew chisel in a planing cut.
This is going to be still a roughing cut, but you can use this cut with a little bit lighter touch to make really smooth cuts.
So I've raised the tool rest, so I'm cutting on the top third of the workpiece, and then we are going to use that short point.
I'm going to leave that short point across, and that's going to help peel off those corners that are left.
So I've already finished this end for the most part.
What I've done here is marked the center line.
Basically, with a French style rolling pin, we want the middle section to be crowned, but that's kind of our working area.
So, this will be the thickest part of the rolling pin, and it will slightly get narrower as we go out.
So, since we've defined that, I want to go ahead and just kind of blend this shape down, aiming for the same diameter.
Another way to do this is to come in with the parting tool and give us some guidelines, kind of like I did for this center section.
So I'll just go ahead and step down until I can see that form following in the waist from this tool.
And then I'll pick up the spindle roughing gouge and blend that in.
Now that we've created kind of a honey dipper look, we'll just come in with the spindle roughing gouge and remove those center sections, kind of blend this whole thing together.
Now, once I have everything smoothed out in the shape I like, I went ahead and defined the ends, and I did that first with a parting tool just to give me kind of an aiming point.
And then I came back with a spindle gouge, and this detailed spindle gouge is just going to allow me to roll over those ends so we don't have a sharp corner, because somebody's going to be rolling dough out and their fingers are going to roll off the edge.
And we don't want that to be a sharp corner.
We want it to be nice and smooth and rounded like everything else.
So at this point, we can go ahead and sand it.
I'm going to do two different steps here.
The first is going to be a rough sanding, and that's going to really depend on how good of cut you got off your tool and what grit you want to start with.
You can start with 80, or you can start with something like 120 here.
Now, when we're sanding spindles, we want to turn the speed way down, not because the sandpaper is going to skip over stuff, but it's more to keep the heat down because heat will really eat up the grit on the sandpaper.
And you want to make that last as long as you can.
And also, when I'm doing spindle work, I will sand with the lathe running at a slower speed like I just mentioned, but once I'm done sanding, I'll stop the lathe, and then I'll come back, and I'll do some final passes following the grain.
So I'm going to go ahead and do a little bit of a rough sand, and then we're going to add some details here on the end.
Okay, so 120 gives us a really good finish.
It's not quite where I want to apply a finish to it yet, but I want to do something first.
We're going to add a little bit of detail here on the ends.
This cherry is going to look great as is once we apply a finish, but by adding a little bit of detail, it just adds a little eye appeal, especially if you're selling these at craft fairs and stuff.
So what I'm going to do is I'm going to use my skew chisel, and I'm going to use the long point down, and I'm just going to make a couple of lines at the end.
These are just detail lines, and I'm going to do two of them.
The reason I'm going to do two instead of three is if you're doing three, they have to be evenly spaced or they don't look good.
If you're doing two, it doesn't really matter 'cause there's only two.
So I'm going to cut in those little grooves here at the end.
And then, my trick is to come in here with just a little broken piece of plastic laminate, and I just snapped this off a spare piece that we had, and I'm going to hold that in that groove as the lathe is running.
What it's going to do is it's going to create a bunch of heat, it's going to start smoking, but it's going to burn a nice black line into my detail.
Otherwise, that detail is going to kind of get washed out once we apply a finish.
And this has been washed a couple of times, but burning it makes it stand out.
And then, we'll come back and finish it with our final grit.
Because this is going to leave a little bit of fuzz around the edge, we don't want to pack it with a ton of sawdust, so we'll come back with 180 and finish sanding.
Now, if this rolling pin was going to go into my house, I would probably not even put a finish on it.
After a couple of washes, any finish you put on, it's probably going to disappear anyways.
But if you're gifting it or you are presenting it at a craft fair, you want it to look good.
So we're going to go ahead and put a food safe finish on here.
The food safe finish that I'm going to use is going to be boiled linseed oil, and then I'm going to top coat that with beeswax.
Now, there are some finishes on the lathe that you may want to apply with the lathe turning, but anything that's liquid based, from my experience, you don't want to unless you want to be wearing it.
And I don't feel like wearing boiled linseed oil, so we'll just rub it on, let it really kind of soak in, and you can see that that cherry pops really nicely.
And now, with any oil soaked rag, we're going to lay this flat and let it dry before we throw it in the garbage.
And now, we're going to apply some beeswax.
This is just a stick of beeswax.
I'm going to rub it on here with the lathe running.
And what that's going to do is it's going to melt some of this beeswax onto the surface, and then we're going to come back with a cloth, and we're going to melt it further.
And that's going to even out that layer of wax and really soak it into the fibers.
It's going to give it a little bit of water protection.
So it might last a couple more washes, but it will eventually disappear anyways.
There we are.
That's a great sheen.
Now we're ready to get it off the lathe.
We can either pull the tailstock away and take this over and cut it at the workbench with a hand saw, or we can go ahead and part it off here.
And I'll do it here.
What I'm going to do is I'll go ahead and get both ends to where they are just a little nib holding them on, and then I'll go and break through on one end, then it's just a little bit of hand sanding to round those off.
There we go.
A little bit of hand sanding, and those ends are ready for a coat of linseed oil.
Now, this is a great quick project.
This cherry looks good, but if you have walnut, maple, or even some beech, it works really well for these rolling pins.
They're a great quick project, and they're easy to sell or give it as gifts.
A pizza peel is a great addition to your kitchen.
Not only does it get pizza out of the oven, it gets bread, and I use ours to carry things between the house and the grill.
Super handy item to add.
To start making the pizza peel, the first step is going to be to create a blank, 1/2 inch thick, 14" wide by approximately 24 inches long.
So ideally, you want to have quartersawn material that will be as stable as possible.
But if you don't have that, that's okay.
Just try and choose stock that has been acclimated to your shop, stable, and we want to glue it up in a couple of different pieces.
So I've got three pieces here.
Now, a pizza peel is not going to go through the dishwasher.
But we do want to make sure we use a waterproof glue.
So, epoxy, polyurethane, or in my case, I'm going to use a type three.
So let's go ahead and start gluing up.
With our panel out of the clamps and sanded smooth, it's time to move on to creating a taper on the end of our pizza peel.
And that taper is going to let it slip under the pizza, the bread, whatever you're using it for.
So what I have here is a simple jig.
It's got a base.
I have two tapered sides, and those tapered sides are going to let this sled with a router ride back and forth.
I have a 3/4 inch bit in my router, although you could use a different size, and I'm just going to start going back and forth, creating the primary taper.
There will be a secondary taper later, and we're going to use a hand plane for that.
But for right now, we're going to start by chewing away the wood and creating a nice, even taper using our jig.
It's a bit messy, but it goes pretty fast, and it's a great way not only for a pizza peel, but for any project where you need that slight gradiation.
Just create a jig like this.
Well, after I finished up routing the taper, I went ahead and took the double sided tape off the back that was holding everything down, and then I took a block plane and gently smoothed and feathered from this flat area into my taper and did a little sanding.
This is a project where you got to sand a little bit in advance before we get to each part.
So, with that done, I've got some layout lines here, and I'm ready to go to the band saw.
Now, this is where a big French curve really comes in handy for a lot of these large arcs and transitions.
So certainly something you might want to think about making for your shop.
Let's go to the band saw and cut this out.
[ Band saw whirring ] Well, we've got the main portion of the pizza peel cut out, but I wanted to add a little bit of contrasting wood to kind of jazz things up a little bit.
So, I'm going to use this piece of 3/16 cherry and create an overlay for the handle.
So, what I'm going to do, I have an arc scribed on my cherry.
And I'm just going to line my pizza peel up with where I know that arc needs to be.
Trying to keep things nice and even.
And then, I'm just going to scribe around the handle of the peel.
Now, of course, this is still just rough band sawing, but I want to go ahead and cut the cherry out, glue it on, then I'm going to go back and make everything into nice, sweet curves and smooth it out.
So, we're going to cut the handle.
I'm going to glue it on.
I'll make everything nice and clean, and we'll meet back at the bench for the final details of our pizza peel.
Well, after gluing the handle onto the main part of our pizza peel, I went ahead and let that dry and then carefully sanded, using a drum sander and some hand sanding, all the edges with particular attention to getting a nice, good feel to the handle.
Now, that leaves one final task that we need to do, and that's put a secondary bevel on the front of our pizza peel so that it can slip under the pizza and the bread and so forth.
What I'm going to do is just take a pencil and I'm going to go ahead and just strike a line about 3/4 of an inch back.
And that's just a reference for me to use a block plane and work my way back to.
I'll probably want the front edge to be a little shy of 1/8.
I don't want it to be too thin, but once again, I don't want it to be too thick.
It's got to slip under the pizza.
So it's just going to take a little bit of work, and I'll just kind of go by eye and feel until it seems right.
And we're going to work from both sides to avoid any split out on the edges.
And there we go.
We've completed a pizza peel.
It's ready for a little bit of food grade mineral oil.
And I think we're ready to make pizza.
Alright, for my weekend project, I'm going to make a cutting board and it's going to be kind of one of those just right sizes -- not too big, not too small.
Perfect when you need to pull out and set up a cutting station in your kitchen that doesn't take up a lot of space.
Now, this cutting board is designed to be made out of two complementary materials.
We have a couple of off cuts from previous projects.
I have some European beech here, which is a sturdy hardwood, and then we had some leftover mahogany that I'm going to use as well.
The colors play pretty well together, and the grain lines, as you see, are going to look really good.
Once I get some finish on it, you'll see the contrast between the two materials as well.
Now, what I want for this cutting board is it to be durable.
And this particular piece of beech, you can see the example here.
It's what's called flat sawn, so that's why you see these cathedral lines on the surface here.
There's a knot that's kind of an issue, and I want to cut around that.
But in order to be durable, I want to use -- and look good, I'm going to use the edge grain, so you can see that I have these really nice straight lines coming off the beech, and that's going to look really nice.
That's also a lot more durable than this plain sawn or flat sawn look.
So, on the end grain, if we look here, you can see I kind of got -- kind of got a smile shape going in terms of what the grain pattern looks like.
I want to cut off thin strips from each side that maximize those grain lines coming off at close to right angles here.
I'll do that on both of these pieces.
I have enough strips here to make two cutting boards.
So what I'm going to do is have one cutting board that has three of the lighter beech strips and two of the mahogany ones, and then just the opposite for the other -- two of the beech and three of the mahogany.
Now, the key here is that even though cutting boards don't go in the dishwasher, you want to use a waterproof glue when you put them together because they are going to be exposed to getting them wiped down and dunked in the water just to clean them off.
And I'm going to glue these up by species.
So just the beech strips and just the mahogany strips, for no real reason other than to just simplify the process for me.
With our two strips for the cutting board, we can take the clamps off, and then glue those up into a single blank.
And once that's dry, it's time to head over to the jointer and the planer and clean up the surfaces, which is where we are now.
You can really see now the separation between the beech and the mahogany and how cool this is going to look.
Now, the next step is to add those asymmetrical curves that define the look of this cutting board.
It's a couple of ways you can go about it.
What I've done on this face is marked off the various offsets where the curves start and stop.
I've also marked the location of the finger hole or the hang hole.
And you can just... kind of add that in with a dimple on the -- with an awl.
And then, to draw in the curves, grab a large French curve.
You can pick these up at art stores or craft stores.
And then find places on the curve where it matches and gives you a nice flowing curve.
You know, and I've marked some of those with tape here that I can lay out that line and -- excuse me -- lay out that line and draw it in.
Then, it's the same thing on the opposite side.
Just find where that curve is.
So what we have here, it's all laid out.
We're ready to go.
Now, there's another way that you can do it.
And this is a good if you're going to be making a number of these cutting boards where you want to be able to kind of crank them out.
You'll still do the layout work, but instead of doing it on each of the pieces, you can do it on a piece of 1/2 inch plywood or some hardboard or spare MDF that you have around, cut that to shape.
Now what you have is a template that you can just set over the top of your piece and trace it.
Now we're ready to head to the drill press to drill the finger hole and make some cuts at the band saw.
You have a couple of goals when you're at the band saw.
You want to remove as much waste as possible, but you want to leave some in order to be able to trim it flush here at the router table.
So what I've done now is attach the template to my blank, and I'm going to flush trim it.
Alright, you don't want to step away from the router table without installing a roundover bit and rounding over all the outside edges, as well as the finger hole on your cutting board.
Then it's just a matter of sanding it as smooth as you want.
Then, it's time for the finish.
So what I'm going to apply here is an oil-based finish that's food safe.
And there we go.
We have a great looking project, and it didn't take that much time to make.
Now, on today's episode of "The Woodsmith Shop", we built three great projects for your kitchen.
Whether they're for yourself or to give as gifts to help enhance everyday cooking and special occasions, you'll find something that you can do in your shop in a short amount of time and end up with some really great projects.
The plans for these are at our website, WoodsmithShop.com.
There, you'll find other great project ideas, videos, and finishing tips on how to make food safe finishes and protecting all of your furniture projects.
Once you're done building something great, we can meet right back here in the Woodsmith Shop.
♪♪ ♪♪ ♪♪ If you'd like to get more video tips and techniques, sign up for the free weekly Woodsmith eTip.
Every week, you'll receive an e-mail with a video tip to get more out of your table saw, router table, and more.
Sign up at WoodsmithShop.com.
Everything in today's show comes from the newly expanded Woodsmith Guild Edition, with shop projects, plans, tips, and technique.
To get a free preview issue of the Woodsmith Guild Edition and a free Woodsmith book, go to WoodsmithShop.com.
In addition, past seasons of "The Woodsmith Shop" are available on DVD, or you can watch them online from your computer, tablet, or mobile device.
For more information, go to WoodsmithShop.com.
Announcer: Major funding for "The Woodsmith Shop" has been provided by... Old Masters -- offering wood stains and finishes for the woodworking enthusiast and professional.
And by... Kreg -- from the first cut to the final assembly, providing woodworkers with products that help to simplify woodworking challenges.
Kreg.
Additional funding provided by... Titebond Wood Glues -- the pro's advantage.
And by... ♪♪ ♪♪


Support for PBS provided by:
Woodsmith Shop is a local public television program presented by Iowa PBS